Monday, November 17, 2014

The Beach Bag

Here is a list of things I have in our beach/river/pool/lake/splash pad bag that I keep in the car in summer, or have in the house all packed and ready to take on a trip:


  • Towels
  • Bathing suits
  • Cover ups
  • Sun block for adults and babies
  • Chapstick
  • Swim diapers
  • Baby wipes
  • Baby powder for sand removal.  This actually works!  But beware, inhalation is harmful to babies....click here to read more.  Somewhere I heard about corn starch, but I haven't tried it yet.
  • Sarong.  Can be useful as a bathing suit cover up, nursing cover, shade, blanket, bag,  temporary first-aid sling....
  • Grocery bags for garbage, wet bathing suits/towels, sandy treasures...
  • Sand Resistant Beach Blanket
  • Hand sanitizer
  • Towel Clips
  • Napkins for cleaning sunglasses
  • Hats
  • Bag for phone/iPad that's water/sand resistant 
  • Beach Tent

The Car

Here is a list of items I either have in my car at all times, or will take with me when we head out:
  • Tether for my two year old
  • Blanket for tyo
  • Extra diapers
  • Extra pack of wipes
  • Books for tyo
  • Toys for tyo
  • Sunglasses for tyo
  • Sunglasses for me
  • Sunglasses cleaning wipe
  • Backpack for packing sippy cup, my water, bug spray, sun block, keys, and cell phone  when we go to the park.  It's hands-free so you can be ready to help toddler climb or swing.
  • Mosquito net for stroller
  • Bug spray
  • Sun block
  • Paper towels
  • Toilet Paper
  • Pikle pack.  I really like the idea of this pack.  Includes little things that you might need in a cute, handy-dandy bag.  I made my own with what I had at my house, which isn't nearly as cute, but just as important.

  • Portable bottle warmer
  • Big heavy blanket for winter just in case there are car troubles
  • Beach/Pool bag and a couple folding chairs for summer.  This ensures that whenever we spontaneously decide to go to the splash pad, etc., we have all that we would need including swim diapers, towels, and bathing suits.
  • Reusable grocery bags
  • Stroller

My Diaper Bag Essentials

You're going to see a million posts on what you should have in your diaper bag, but here is a million and one, for what I have.  My current situation includes a three-month old and a two year old who is not quite potty trained.


  • 3 diapers for her, the two-year old
  • 6 diapers for him, the three-month old
  • Baby wipes
  • Diaper cream
  • Disposable bags for poopy diapers.  I like these but you can use plastic grocery bags.  Fold them like this to keep your bag neat and tidy.
  • Hand sanitizer for me after diaper changes
  • Hand sanitizer, alcohol-free for her prior to snacks
  • Change of clothes for him, her, and myself.  I don't know how many times I had to go home because I got baby poop/pee/spit up all over my outfit. 
  • I saved a puffs container and use to store plain Cheerios for snacks.
  • Pop-Tart Container to store her delicate cereal bars.  It's nice and thin and I can actually use it for it's intended use if I want to take a Pop-Tart for myself. 
  • Her snack cup
  • Her sippy cup filled with milk or watered down juice
  • A bottle of water as backup for her
  • A sandwich zip lock bag filled with pacifiers and a pacifier clip
  • Pain reliever for mommy and daddy. 
  • Chapstick
  • Panty Liners for me
  • Nursing Pads
  • Thin infinity scarf for nursing
  • Small warm blanket for baby
  • Receiving blanket for diaper changes
  • Receiving blanket for nursing
  • Small bottle of baby sunblock
  • A dose of Camilia for teething
  • My keys
  • My wallet
  • Sketch pad for her
  • Coloring book
  • Three crayons
  • Stickers
  • Small Little Golden Book
  • Flash Cards
  • Toy clip for rattles/baby toys
  • Rattles/Baby toys
  • Chewing Gum
  • Occasionally, I'll pack the following items: 
    • iPad
    • I reading book for myself
    • Baby bottle filled with breast milk
    • Bottle warmer
I don't have this diaper bag, but if I were to buy another, I would shoot for this one with easy access to wipes!  I find I use wipes quite frequently and it would be so convenient to have them within reach.

I enjoy variety, so I never use a the same diaper bag for very long.  Luckily, I have a problem with getting rid of stuff, so I have a ton of old bags and large purses collecting dust in my closet.  I will switch out my traditional diaper bag for one of these every couple of weeks or so to mix things up.  It also makes me feel better that my cute purses for my own stuff has been replaced with a diaper bag.

Thursday, November 13, 2014

Clothes

I was very fortunate to receive a ton of baby clothes for my children and I am thankful to all my friends and family.  I ended up having clothes for my daughter till she is five years old!  But where do you put all those clothes?  Here's my little system that works pretty well for me.

For clothes that are too big: I separated by size and placed in space bags and stored under the crib or in the garage.

For clothes that are too small: I have a mesh laundry bag in each of the kids' closets that I throw the clothes that are too small.  Once this fills up, I'll separate by size and store in a space bag.  Since I'm not sure if we're done having kids yet, this is my system, but once we decide we're done, I'll first donate to either friends or family who could use them and then send to consignment. 

I also saved all of the hangers that come with baby clothes from gifts and the baby shower.  And any time I found baby hangers at Goodwill, I would buy them at a fraction of the cost.

The Carry-All Bag for the Home


I have a bag that I use at home to carry my crap with me around the house.  It's a Thirty-One Gifts bag that I use, but any bag or basket will suffice.  Having a carry-all is especially useful if you have a two-story house.  It saves you time running from room to room for things you use on the regular.  Here are some things I have in mine:
  • chap stick
  • book
  • deodorant
  • highlighter
  • pen
  • notepad
  • baby monitor
  • nipple cream
  • extra nursing pads
  • extra hair ties/clips
  • cell phone
  • iPad
  • drink 
  • baby's gas medicine
  • granola bar
It's useful when going to bed, going outside to watch kiddos play, cooking in the kitchen, watching children play in playroom.  It's great when you have your hands full of infant and trying to shut doors behind you and getting your toddler to stop hanging on your legs.

Tuesday, July 22, 2014

17: Safety Tips

1.  Ear/Bath/Food Thermometer This thermometer has worked great for us!  I like how it's all in one.This safety tip is specifically for the bath and food temperature.  Greater than 100 degrees fahrenheit is too hot.  Another way to test food temperature is with your lip and not your tongue or finger which, at least for my husband and I, can tolerate hotter temps.

2.  Pool Noodle Door Stop This is such a great idea! We tried it and it works pretty well.  I would recommend using the thicker pool noodles as opposed to the skinny ones.  The skinny ones tend to pop off.

3.  Safety Harness  Ok.  I promise you'll get dirty looks for this one.  But I swear by it! Right now I'm 8 months pregnant.  I was instructed by my OB, due to some issues, that I was not to be lifting heavy objects.  My daughter pitched fits and kicked my belly and flailed all around when I would try to get her in a shopping cart.  On several occasions, McKayla has bolted in Target and the grocery store and there my pregnant ass was, running after her with my cart containing my wallet and keys and cell phone, and frantically telling her to stop without yelling like a crazy woman.  This is as stressful as it sounds and it's making my blood pressure go up just remembering it.  Back to the safety side of it, I use it not as a leash but as a fail-safe for when she gets a wild hair to jerk her hand away from me and bolt in a busy parking lot.  I have seen, on two separate occasions, of little toddlers take off running in the parking lot straight to the store.  I just heard of another event from a friend off of Facebook who almost ran over a child who did this.  I treat McKayla as if she is not wearing it all.  I make her hold my hand in unsafe conditions like walking through the parking lot, or down the wine isle in Target.  It provides her freedom to walk next to me instead of being restrained in yet another seat belt.  When she acts up, I threaten to put her in the cart and that usually corrects her behavior.  If it doesn't, she gets put in the cart.  Now she will even request to get in the cart!  I will take all the eye daggers in the world if that means it might save my daughter's life.

Monday, July 21, 2014

16: Sleeping Tips


I've read and heard a lot of tips and advice to get a baby sleeping.  Some scared me.  Some I tried and failed at. Some actually worked for me.  Getting a baby to sleep, particularly through the night seems to be a touchy subject with many moms.  I'm sharing what I've learned and what finally worked for me.

  • Noise: I used to think when I was getting McKayla down for a nap or down for the night that it had to be quite in the house.  I soon learned that any noise could potentially wake her.  Then I realized that noise was ok.  I would leave the t.v. or radio on.  I would talk in a regular voice and not whisper.  She would still sleep.  So when some random noise would occur that would have normally startled her awake had it been silent, like the dogs suddenly bolting through the doggy door to get a squirrel, she was now sleeping through.  I'm not saying to blare your music, but don't walk on eggshells in dead silence.  I really believe that hearing this normal background noise is comforting to baby as reassurance that you're still there.  During the day, she napped downstairs with/around me, but at night I would put her in our quiet bedroom.  To prevent the dead silence, I used a sound machine to help.  That way when my husband and I would come up to bed, our creeky door, sloshing toilet, mechanical toothbrushes, and loud sheets wouldn't wake her.  She is 23 months now and I still use the sound machine, mainly on white noise, for her naps and bedtime.  But instead of having it on all night, I'm utilizing the built in timer to go off in 90 minutes for two reasons. One, she broke the plug-in adapter and I have to use batteries which would need to be replaced every 2-3 days.  Two, a wise woman told me that kids were losing their hearing from sound machines.  I honestly don't believe the volume that I have her sound machine set to would do such a thing, but it's still in the back of my mind.  Will actually have to research that for verification.  Another thought on sound machines is I've been told by my brother, Zack, that the best sleep actually comes from complete silence and complete darkness.  We just don't have those kinds of variables available in our household to satisfy these conditions, so I'm sticking with have a little noise so as not to startle. (Another reason why I have sound machine set to timer....another thing in the back of my mind.)
  • Napping as a baby was usually never a problem with McKayla.  It started to be when I was trying to get her to nap in her crib when she was older and more aware of what was going on.  Some days she would just lay down and sleep, but those days were fading.  I tried some non-cry-it-out methods, but they just made her worse and she just wouldn't nap at all.  What worked best for me was her crying it out to get her to nap and sleep at bedtime (I would still get up with her to nurse and change her diaper whenever she'd wake at night).  Nearly a year ago now, we moved to another state and a month or so after settling in, she started to stop napping again.  And I folded.  I would let her nurse to sleep on my lap and either I would watch t.v. or nap with her till she woke.  But I was stuck there.  I had to make sure I had enough to drink or snack on and I couldn't repsosition and I coudn't pee.  I was still nursing and changing her diaper 1-2 times during the night every night.  A few months later, I found out I was pregnant.  After visiting McKayla's  clinic for her routine appointments, her pediatrician was the one to tell me that for my and the new baby's health that I needed to get McKayla sleeping through the night and napping on her own.  Which meant getting her off of nursing (I was trying to nurse her till she was two) and letting her cry it out.  She promised McKayla would be sleeping through the night within three days.  At a year and a half, I stopped nursing McKayla and attempted letting her cry it out....again.  It worked.  In the estimated time, three days later, McKayla was sleeping through the night.  It was such a relief. I was finally getting a full night's sleep and so was she.  I was able to decide during her nap if I wanted to clean or work on a project or nap myself, in the position I chose.  (I still kind of wish I could have nursed her till two, but when I got pregnant, nursing became so painful.  Plus she was biting....and laughing about it....then biting harder to my screams and pleas to let go.  It was an easy out for me once I was advised to stop.)  Something else that has been working for McKayla these days, mainly for her naps is music.  The type of video monitor I have has a lullaby option  and I'll turn this on if she's fighting a nap and she'll be asleep within five minutes.  Again, this is what worked for me.  I know many parents who have had circumstances work differently for them and they don't use the cry-it-out method.  Best of luck in which ever path you take.
  • I just discovered a blog that changed my life!  It had my two-month-old son sleeping through the night! http://pinterest.com/pin/371898881703125940/

Wednesday, July 2, 2014

15: Where To Get Baby Gear

Sure, there's always Target and Amazon but here are a few places to get things for free or on the cheap.


  • Freecycle.org is a nifty website I was told about where you can post or see posts of stuff to get rid of or to pick up.  It's free and green.  Check out the website for more details.  I have not actually used this yet, but certainly intend to.  I was told you can get great quality baby gear for FREE!
  • Thrift stores, GoodwillSalvation Army, and consignment shops are excellent sources to find baby gear for great prices.  
  • Always accept hand-me-downs.  I have clothes for McKayla till she's 5 years old! And many of her baby gear are from friends and family.
  • Ebay and Craigslist are great sources too.  I've heard of moms getting bags of baby clothes for a fraction of the original costs.
Please always stay safe considering these options.  Use your best judgement if visiting people's homes and accepting used baby items.  Check out Parents.com for tips on buying used baby essentials.

Most of these clothes were  hand-me-downs.

14: Spit Up

While my daughter was still nursing, she would spit up all the time throughout the day.  I don't know the cause, although, after talking with my friend Allison, she has a theory that her drinking coffee was the cause for her baby spitting up.  Not sure if it was the caffeine or what, but if she didn't drink it, he wouldn't spit up.  I'll have to remember that when my son arrives (BTW, I'm eight months pregnant!  Yay!).  Anyways, an easy, simple solution to preventing having to change her every ten minutes was keeping a soft, absorbent bib on her all the time with the exception of sleeping.  At those ages, she was always with me so I could keep an eye on the bib getting uncomfortable, turning, flipping or pulling.  When she spit up, it would go on the bib and when it needed it, I would change it.  It was so much easier than having to change her whole outfit.


13: It's Never to Early to Learn

It is so easy to expose your baby to learning.  Here are a few ways how that worked for my little McKayla.

  • Counting her outfit buttons during diaper changes.  After I would count out loud, I would then show her my fingers and count to that number again.  Can you believe that I've gotten up to 12!
  • Count the stairs as you climb them.
  • At bottom of stairs, tell her/him we are going to go UP the STAIRS.  Vice verse with going down.
  • Read to your baby.  Most of the time the books I read captured her attention.  Choose ones with short paragraphs or one liners a page and with bright, fun pictures.
  • Present flash cards.  I used to do them once a day with her and it held her attention pretty good.  If she got bored, we just stopped doing them.  
  • Start your baby on "Your Baby Can Read!" DVD's. I started McKayla on the set when she was around a month old.  I called it "going to school."  She would get so excited when I'd say that.  To this day, she's 19 months now, she "goes to school" every morning.  I have since expanded her selection.  She loves the Baby Einstein videos which you can easily find on YouTube or you can purchase the DVD's.  Just recently she's really gotten into "Wild Animal Baby Explorers." She even requests to watch it by saying "babies!" I like to limit how long she's in front of the TV and let her go for about 45 minutes, which is how long some of the shows are.  Added benefit: I get 45 minutes to clean!  UPDATE: My daughter is now 23 months old so I want to add a couple of new things.  We were introduced to Daniel Tiger's Neighborhood by my friend ZoĆ« D..  She loves this show and so do I.  Great learning tool!
    My daughter watching Baby Einstein 
  • Start teaching your baby right and left.  When putting on socks, shoes, shirts, pants, seatbelt.  I know many adults who are not very good at knowing right or left so I think the earlier and more they hear it as babies, the better the chance they'll have it correct in their head as children and adults.  In fact, when I did test the theory on McKayla at 18 months, she did so correctly.  I asked her to give me her right foot to put her sock on and that's the foot she gave me.  Now I know that she had a 50/50 chance of getting right and that maybe she just got lucky.....BUT.....what if she just knew!
  • Tell her/him the color of the garment you're putting on them.  I've heard that children don't understand the concept of colors until much older, but still, what could it hurt?
  • Speak another language.  Are you bilingual?  Is your spouse?  If so, teach them the other language from the start.  Click here to read more on the subject.  
  • Talk to your baby all the time.  Tell him/her what you are doing whether you're cleaning or giving them a bath.  They're learning with every word you tell them.
  • Teach your baby manners.  As soon as they seem to get the concept of "give me something" they should also be provided with the know-how to be polite.  McKayla was able to say (in the best of her ability) and properly use the word "please" just after a year old.  She has even waved thank you to a car in the parking lot who had let us pass by because she saw me do it.  She was around 14 months old.  Show your child how to use please, thank you, God bless you, and excuse me.  The world will thank you for it.  
  • Encourage your child to help you clean up his/her toys at the end of the day.  My friend Rachel S. gave this advice to me and said that if you show them young, once they're old enough to understand how to do it themselves, it becomes automatic.  It worked for her daughter.  
  • I used to be so opposed to a child/baby using an iPad/iPhone.  I don't know why because it's a great learning tool.  There are a ton of apps that are free for babies to use.  Read this post about how to lock your iPhone so the child can't leave the app by accident.
  • Start your baby on checking for traffic in parking lots.  In the past two months, two toddlers older than my daughter of 23 months, have took off running through the parking lot, across the lane, all the way to the storefront.  Ever since my daughter seemed to slightly understand what I was saying or even was able to look in the direction I pointed to, I have been repeating to her to check for traffic.  When I'm carrying her, pushing her in a cart or stroller, or having her walk with me with her hand in mine, I have her stop, tell her she's about to cross the road and to check for traffic.  She points one way and looks (I tell her look left/right as she looks), she points the other way and looks and sometimes, on her own, she has pointed behind her and at extra awkward lanes.  People, she is not even two years old.  All it takes is taking the time to protect your child.  As she gets older, she will be able to do this without prompting and struggling with me to get her to do it. 
  • Have your toddler help with caring for your pets.  Please keep safety in mind first.  Don't involve your baby if you have a food aggressive dog.  And also make sure baby can't find their way into a fish tank.  McKayla has been helping me feed the fish and the dogs for several months now.  We've worked up to these tasks in steps, but currently, for the dogs, she grabs both of their empty bowls, takes them to the laundry room where I store the food, and sets them up on the hamper.  I fill the bowls and she'll carry one, I'll carry the other.  She'll place both of them on their rug where they're fed and tell them "babies," short for "good babies" (their release from sitting to eat their food).  She's able to do this with my dogs because they are calm and trained to wait to eat their food.  This may not work for everyone depending on the temperament of your dogs.  Use your best judgement; maybe baby can only help with some steps and not all.  As McKayla gets a steadier hand, I'll teach her how to fill the bowls, but right now that causes a mess.  As for the fish, I have three betas in small little tanks that are always out of her reach or behind closed doors. (which will need toddler proofing soon).  I have one on my bathroom counter she can reach and I will place the fish pellets in the palm of her hand and she'll drop them, one-by-one, into his tank.  She thoroughly enjoys feeding both the dogs and the fish.  When I do anything else, like fill the water bowl for the dogs, or change the fish water, I let her observe until she's older, but helping me feed and observing what goes in to having a pet teaches her how to care for lives that are dependent on us.  Another plus is that one day, she'll be able to help me do these tasks down later down the road when there is another baby to take care of.


Tuesday, March 4, 2014

12: Wait...I'm supposed to clean the house too?!

I have to admit, I wasn't very good at keeping my house clean before the baby so you can imagine my worry keeping the house clean with and for a baby!  I have certainly surprised myself! I think I've vacuumed more in the past nine months than in my entire life!  I'm not kidding! Before I begin my suggestions and what I TRY to routinely do, keep in mind I am a stay-at-home-working-mom. Also remember, baby comes first, cleaning will fall in place when it should so try not to let it stress you out or drive you crazy. But once you find those golden opportunities, here are some tips to help keep your home tidy. 


  • Once baby naps, and you don't need to take one yourself, use this opportunity to get some cleaning done. 
  • Get a baby carrier to use during vacuuming.  Make sure it is ergonomically safe for baby such as the carrier in the link.  (Which was a gift from my awesome friend ZD!) Babies actually enjoy the hum of the vacuum and McKayla has actually fallen asleep several times while I was vacuuming.  The carrier listed is for front, back and hip so you can choose what is best for you. Added benefit: great workout! Especially if you have stairs (be careful!!) and your exercise naturally increases its own weight!  Once your baby is grabbing and can reach the back of your head, I suggest wrapping a bandana or scarf around your head. The last time I vacuumed I HAD to do something, she was going crazy on my hair! I folded it in half once to make a triangle, placed the straight edge at the base of my hair, tied the ends at the top of my head and tucked the corner under the tie. She grabbed at it, but couldn't grab any hair. It also helps to attach a toy for baby to play with or chew on. 
  • Use an umbrella stroller to walk baby around the house.  This was actually a life saver when she would cry and we couldn't get her calm. It works great for me when I'm trying to pick up the house. I attach a toy for her and I walk around the house, pick up this, put it away, pick up that, put it away.
  • Once baby is more mobile, carry a microfiber cloth in your back pocket.  When she gets entertained by something and I see something within arms reach that I can I dust, I do a little wipe. Before, I always noticed dust in the oddest places that would never get touched, so while I'm walking her around the house and watching over her as she explores, I can dust those places she'll get into that I would otherwise never have thought of touching. 
  • Clean dishes after every meal. I know, I know. That's what your supposed to do, right? Not me. Not ever. Until now. It makes it so much easier to clean a couple of dishes or even a few dishes as opposed to an entire sink full.  I was usually good keeping the sink clear until the dishwasher was running or waiting to be unloaded, then the dishes would pile up. Now, I've made a rule to myself that every time we eat, I clean out the sink whether that means dishwasher or hand wash. I haven't had a problem since I decided to follow this rule. And when my husband is home, my rule turns into clearing the sink every time I visit the sink. LOL!  Update: Let your toddler help with the dishes.  I only let McKayla help/play with the sliver ware and cooking utensils.  This helps to keep her within eyesight when you're trying to wash the dishes.  It teaches her that there's more to just eating the food on the plate with a spoon, but now that spoon and plate must be cleaned afterwords.  It also teaches her boundaries because I won't let her touch anything else on the rack like glass dishes.  Just make sure there is nothing sharp she could hurt herself with.  Hand wash sharp knives, pizza cutters, graters, etc.  And also make sure she doesn't wander off with a handful of forks that she could trip on.
  • To help me keep her high chair tidy, I keep a pack of baby wipes in the holder underneath.  I use these to clean her face and hands and her tray top so that I don't have to make an extra trip to get a washcloth or deal with the hassel of cleaning that cumbersome tray.  And just recently I've started collecting the dirty ones in a mesh laundry bag and washing with her laundry to reuse in an all natural, home made solution.  Trying to be greener and healthier.
  • Once you have a toddler who can be in the bathtub safely without you having to constantly have a hand on her, you can have an opportunity to clean the toilet.  I say this because my toilet is conveniently located within two feet of the tub, so I literally don't need to move anywhere.  To keep your toilet tidy, keep a container of disinfectant wipes near your toilet (out of toddler's reach) and do a quick wipe down during the bath.  I've also just started a new thing (this may be because I'm nesting at 8 months pregnant) where after every time I use the toilet, I take a piece of toilet paper and do a quick wipe under the lid, on the rim or where ever I see could use a wipe.  It's so quick and easy and help keeps my toilet clean in between major cleanings.  

11: Musical Changing Tables

I ended up acquiring a plethora of changing tables or pieces containing a changing table. This really worked to my advantage in our two story home. While she was still sleeping in our room, we had a hand-me-down bassinet that had a changing table.  


We had purchased one for her bedroom that matched her crib that we used when in or near her room and, of course, once she started sleeping in there. 


Then we had received another changing table hand-me-down that I used downstairs where we usually were. 

Lastly, we received a convertible play yard as a registry gift that had a changing table too. 


I used every single one of them...often. There were so many options, it was like playing musical changing tables (except with no competition...and no removal of tables)! If you are able to acquire a few changing tables, use them to your advantage throughout your home, especially if you have multiple stories or a lot of square footage. 

Monday, March 4, 2013

10: Nursing Tips

What To Expect The First Year has tons of tips and benefits on breastfeeding.  In addition, Baby Center is an excellent source as well.  These guides will help you get started on breastfeeding and answer all the questions you should have.  Below are tips that have worked for me through trial and error.


Picture source: http://breastfeedingcycle.wordpress.com


1. Using receiving blanket during nursing.  After realizing how messy breastfeeding was becoming with dribble, spit up, and my nipples spraying, I found an easy way to feed and stay mostly clean at the same time.  
  • Fold a receiving blanket long ways a couple times or use a burp cloth.  (I like the blanket better because it has a longer reach to clean up messes and are thicker to absorb.)  
  • Tuck one end into your nursing bra so that it is positioned between the bottom of your bra and the bottom of your breast.
  • Flip the loose end of blanket over your shoulder.
  • Place baby in cradle hold.
  • Place loose end of blanket over baby's chest and under chin (kind of like a bib).  You can either place under or over baby's arm.  Sometimes I'll place over her arm to keep her from scratching her face or my face, pulling her hair or my necklace.
Now, if baby spits up during feeding, or dribbles milk from mouth, most, if not all of it will be absorbed into the blanket.  You can also use the loose end to wipe her mouth or face (if your breast sprays her if she unlatches).  It also works great for burping either with baby sitting on your lap or over your shoulder.

2. In the first few months before my breasts got used to a feeding schedule, I would wear a nursing pad in each bra for leaks.  And I would use an app to help me keep track of which breast I fed with last.  But now, I don't seem to leak at all unless they're really full (like in the morning) or if I went out for several hours without pumping or feeding.  Not sure if this will work with everyone, but if your breasts seem to be fine throughout the day, this might work for you.  I now use one nursing pad and it's on the side that I'll need for her next feeding.  When I do sit down to feed her, I simply switch the pad to the other side.  Now I'll know which breast to use at the next feeding without having to use an app or bracelet or memory.  And the pad is in place for the only leaky breast once my milk drops during her feeding.  The only time I ever use two anymore is when I go out in public.  Using only one also saves money.  If you are one who needs to wear two all of the time, then what I did with the one I took out for feeding was folded it in half, like it was when it was wrapped, to keep it clean and tucked it into my opposite bra strap. (Unless you stick it to your bra...I never tried this...don't know why).  Prior to figuring this out, I was always losing it and dropping it.  Just keep an eye on roaming baby hands.  McKayla has snatched it right out a couple of times!  My favorite nursing pads are the Lansinoh brand.  They're disposable.  They held up with nipple cream.  They were the smoothest under my bra and shirt.  Although, recently, I was informed about reusable nursing pads called LilyPadz.  My friend Lisa Walck said that she loved the product and that they prevent leaks and form to the breast well.  I will have to try these myself.

3. Use your nipple cream.  My favorite was Lansinoh Lanolin.  My suggestion is to buy a tube for each nursing station you have so you don't have to tote it around and risk forgetting about it.  When she was about a month old, I was starting to slack on using it and I honestly believe that was the reason why I ended up with mastitis.  That really sucked.  So slather it on there!

4. Enjoy this time.  Nursing is a great opportunity to bond with your little baby and the perfect time to relax.  But if you feel that you should be multi-tasking, there's always your phone to check e-mails, Facebook, Pinterest, news or read a book through the Kindle app.  Once you get your positioning down, you can also read a magazine or book.  You can also have a chance to catch up on any shows.  That's the only time I get to is during nursing. 

5. Update: Use a bracelet or hair tie to help you remember which breast to start with.  It SEEMS like this wouldn't be a difficult task to remember, but trust me, it can be, especially at 2:00 AM.  I would wear something I wouldn't really notice during sleep, like a loose hair tie, then I would switch it at the end of the feeding (stay consistent with this or you'll confuse yourself; been there, done that.)  At the next feeding, I would use the breast in relation to which wrist my hair tie was on.  Read number 6 for another tip.

6. Update: In the beginning of nursing, I was wearing nursing pads all the time, but later on, I didn't feel the need to.  This will not apply to everyone, but if you're like me, this tip will be useful.  I would either go with only one nursing pad in my bra (instead of one for each breast) or not wear any and would keep a supply at my nursing station.  The reasons for this is 1: I didn't like my options of putting the other pad somewhere while my breast was in use and 2: I saved money on nursing pads.  I always needed at least one for the non-nursing side because it would leak while McKayla was nursing and would usually never leak any other time.  So I would just use the one I had in my bra (which also helped me to remember which side to start nursing on) or I would use a new one from my supply.  When I was using two, you can either place the one not in use into the other side of your bra with the other pad or in a pocket that some covers provide. 

7.  Update: If you have a frozen milk supply, and need your milk to defrost in a hurry, place the sealed milk bag/container in a bowl of cold, not warm or hot, water.  My husband told me about this and it defrosts much faster.  I don't know how to explain why, but I'm a believer.


Wednesday, February 27, 2013

9: Work That Body!

Two Days Prior to McKayla's Arrival

 My weight the day before McKayla Belle was born was 167.8 lbs.  I had gained 35 pounds during my pregnancy.  I was super eager to get rid of that excess weight after she was born and by the time she was four months old, I was back down to my pre-pregnancy weight!  This is how I did it:
Four Months After Giving Birth

First and foremost, be sure to get your doctor's approval prior to doing any workouts, and that goes for vaginal and c-section deliveries.  It's usually around 6 weeks after giving birth that they give the ok, as long as there aren't any issues.  Don't push it, you'll get your chance to get back in shape; meanwhile, use that six weeks to relax when you can so your body will heal faster.  Also, easy on any diets.  Eat a well-balanced diet without any major changes.  Read more HERE.  In addition, know that if you are breast feeding, you're already burning 500 calories a day (YAY!) (Eisenberg, Murkoff, & Hathaway, 1996).  Read more HERE for more information about working out after giving birth.

1. As soon as I was feeling up for it, I would take McKayla Belle for a stroll every day in my neighborhood.  It was nice to get out of the house for some fresh air and I'm sure it was good for her too.  I always had someone with me, my momma, my daddy, my momma-in-law, my husband.  It was an easy thing to do that wasn't hard on my body and baby got to enjoy it too!

2. After I got my doctor's ok at my six week check-up, I started more strenuous exercises.  I found these ten minute work-out videos on YouTube by popsugarliving that I would work-out to every morning (I never skipped a day until I reached my pre-prego weight!).  I've never been a person to like to work-out, especially for very long, plus, now I didn't have that much time to do so. So ten minutes while she napped or watched her video was perfect!  Below are the videos I would work out to once a day:


3. An exercise I like to call vertical dance, otherwise known as pole dancing.  Before you cast judgement, I need to point out that I am not a stripper (and have nothing against them!) and don't plan on being a stripper (and have nothing against the field!).  I simply enjoy the art, challenge, and full body workout it provides.  I happen to have my own spinning pole at home which has already paid itself (Nooooo, not what you're thinking!  I mean compared to classes!).  There are classes available that I would recommend if you're a beginner and are interested or not sure if you are interested yet.  (For safety's sake, you should start with an experienced instructor and get comfortable performing the moves, especially inverts, before venturing home with a pole.)  That's where I started.  When I got good enough, I decided to get my own pole and worked out at home.  (If you do work-out at home, never practice inverts alone.  Make sure there is a friend or your husband available in the house to help if you get seriously injured.)  Unfortunately, my pole instructor moved the business farther away, so now I started self-teaching through apps and YouTube videos.  Working out on the pole is a fantastic work-out and excellent confidence booster!  As with most sports, there is the risk of minor (bruises, pole burn, rug burn) and major injuries (sprains, or worse).  In the beginning, everything you do hurts, but there is a saying that if you're in pain, you did it right!  LOL!  The more you practice, the less it hurts.  It also hurts less and is more fun when you work-out with girlfriends!  So if you're interested, look to see if there are local classes you could join.  Also, try to go to a show.  I mean a professional pole dancing show.  I've been to several and let me tell ya, most of the audience is women!  You'll hear in the the videos below that most of the cheers are from girls.  If later down the road you decide, "Dang!  This is fun!!" then below are some links to get you working out at home.


References:

Eisenberg, A., Murkoff, H. E., & Hathaway, S. E. (1996).  What to Expect When You’re Expecting. New York: Workman Publishing.

Monday, January 7, 2013

8: Make The Most Out Of Me Times

It's hard to care for yourself being a new momma.  Bathroom breaks are hard to come by these days, not to mention showers!  So here are a few tips to make the most out of me times!

1.  Keep a container of flushable wet wipes in each bathroom.  Use these where necessary each chance you actually get to go to the bathroom.  Genitals, underarms, etc...  This will help you keep fresh until your next glorious shower!


2.  Store lotion at each sink.  With all the diaper changes, my hands are having one hell of a time with cracking and soreness this winter.  So after I wash my hands, if I have time, I'll throw on some lotion.

3.  Do the same with lip balm. I have one in my car, purse/diaper bag, living room (right where I normally feed her during the day), bedroom (again, where I feed her) and each bathroom.  

4.  Ditto for deodorant.  

5.  UPDATE:  Dry Shampoo for your hair.  So you can at least pretend you're fresh and so clean, clean!  Dry Shampoo

This is a very short list, but may come in handy when honey is working a long day! :-)  Will add more if think of anything else.

7: The Notorious Diaper Change

Before McKayla came along, I hadn't ever changed a diaper, at least for as long as I can remember.  I have to admit, her first diaper that needed to be changed in the hospital I ended up calling up a nurse to do it while I observed!  It was pretty funny, because I started out strong and undid her diaper, took a peak, and fastened it right back up!  I didn't even know where to start!  So here is my advice to you and some tips we have figured out along the way to prevent huge messes!

If you have a friend with a baby, ask if you could practice a diaper change or two and ask them for any pointers.  Or at least watch a diaper change.  I was offered an opportunity by my friend BB, and I foolishly passed it up.  I was nervous about holding a baby, much less, changing one's diaper!  But I definitely should have tried.

The first night we had her home, my husband was changing her diaper in our bedroom.  I was heading to the room and right before I opened the door, I heard "OH GOD!"  LOL!! When I walked in, he was bent over her with diaper in hand saying "She won't stop!  It just keeps coming!"  She was projectile pooping a good several inches!  Every time he would get her cleaned up, she would poop all over again!  I couldn't help but laugh!!  He was covered in poop and her changing table was covered in poop!  After this accident, we tried several attempts to prevent that from happening again and this worked the best for us...

1. Make sure she's done!  This was my husband's rule, understandably enough!  In the first month, I would recommend giving her at least five minutes after you know she went, maybe even ten.  On several occasions, we would hear her go, then immediately go change her.  Then we would get blasted while she was unprotected on the changing table or she would get urine running up her back soaking everything in its path!  As she gets older, you'll tend to know when to change as their defecation becomes more consistent. (You'll still have some accidents, but not nearly as many as in the beginning.)

2.  Use an old towel for changing tables that don't really have any protection, such as the play yard or the bassinet changing tables.  I fold it to provide four layers of protection and absorbency.  I tried disposable waterproof pads.  Waterproof, yes, but it would absorb and then run up her back.  Same thing with paper towels.  The best was a bath towel.  Even now, each of my changing stations have a folded towel.  They absorb in the same spot and don't allow the urine to travel, are reusable and easy to clean, provide a bit more cushion than the changing table provides and they also provide a warm barrier for her to lay on as opposed to the cool material of the changing table. UPDATE:  06 Mar 2013.  Now that my baby girl is seven months, she no longer fits on the changing tables below and now am using her changing table/dresser with the pad and cover.  I have eliminated the towel and now just use a disposable changing pad.  She rarely urinates with her diaper off now, but when she has a poopy diaper, the pad protects her changing pad cover (which is white...what were we thinking!).  I do cut these in half because I don't really need protection near her head and it saves some money.


3.  Have all of your supplies ready to go.  Fresh diaper, wipes, rash cream, baby powder.  In the first two months, I would even have her clean diaper unfolded and ready to grab.  As long as I had everything lined up, her changes went smoothly and quickly.  Each diaper station is stocked with Desitin, baby powder, diapers, a refill pack of wipes, and a spare towel.  Her wipes are in the warmer and I carry that to the station I'll be closest to most of the time.  If I happen to be at the other station, I'll at least have the back up wipes.


4.  Talk to your baby during the diaper change.  From laying her down, to undoing the onsie, to taking off the dirty diaper, etc...  It is good for them to hear your voice and they learn how to speak by hearing you speak.

5.  The diaper change: 
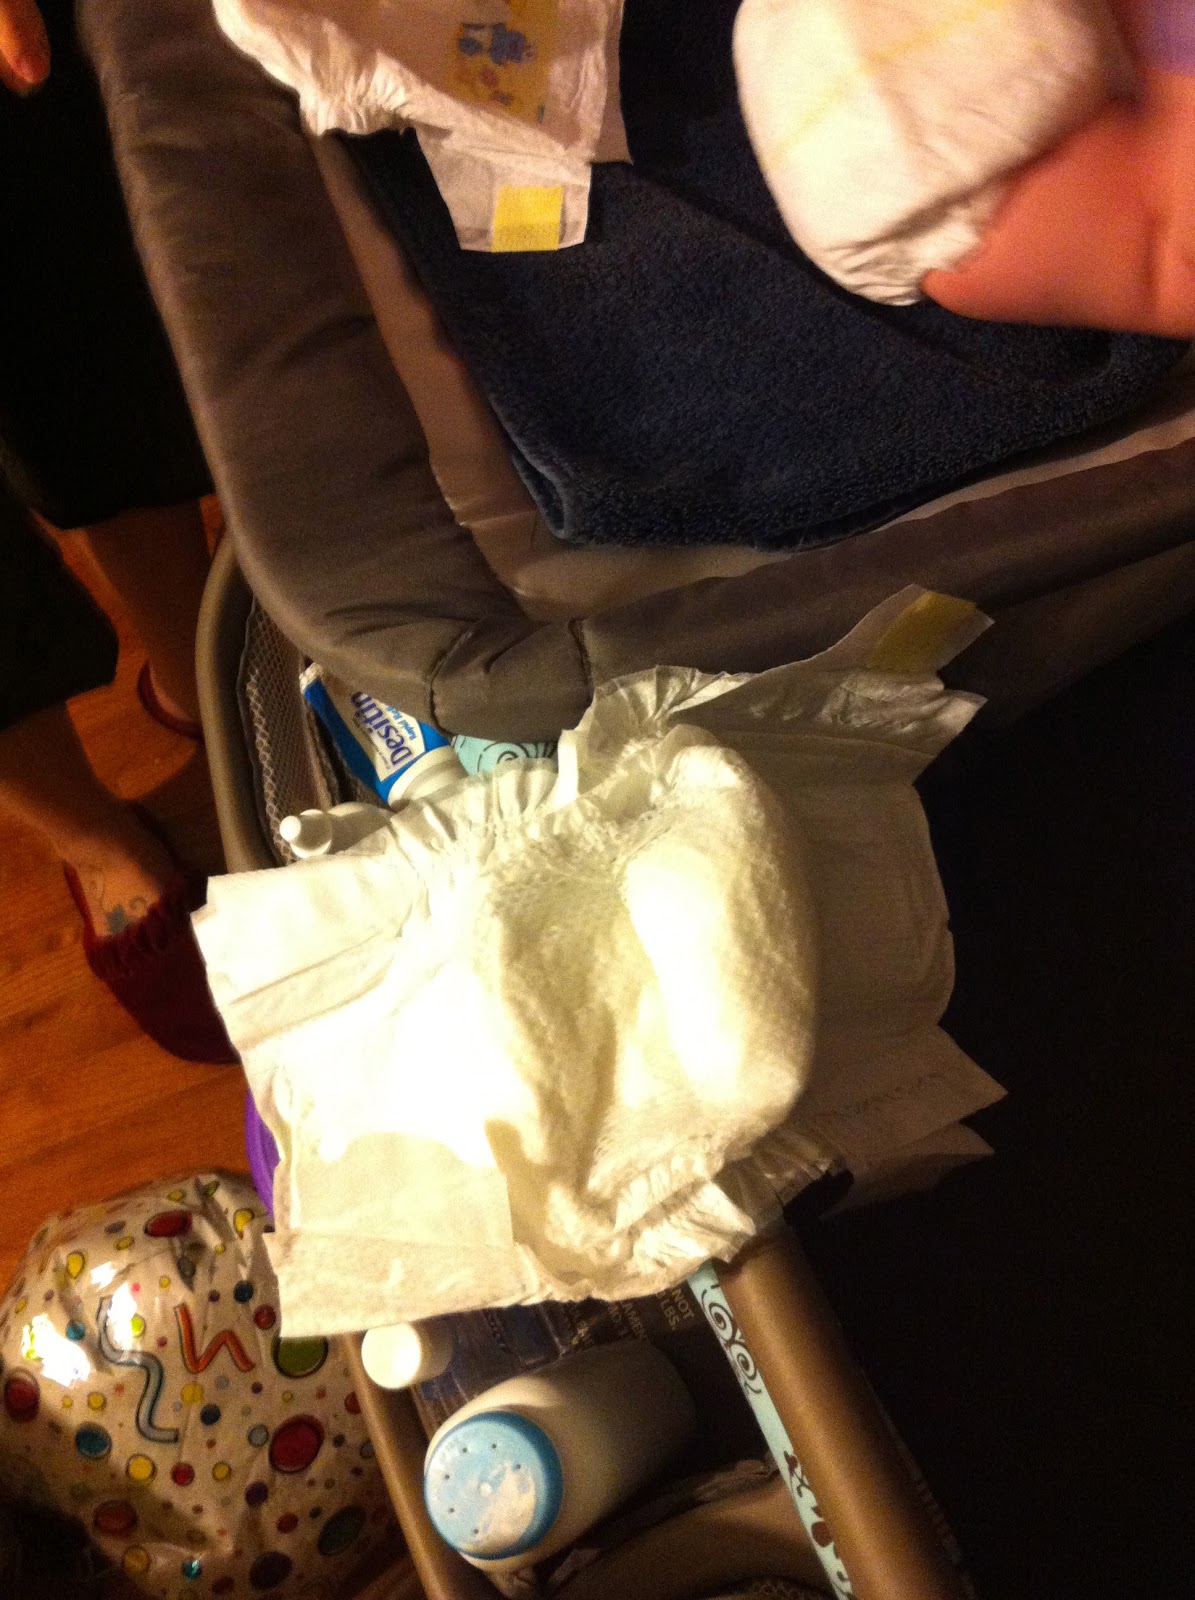
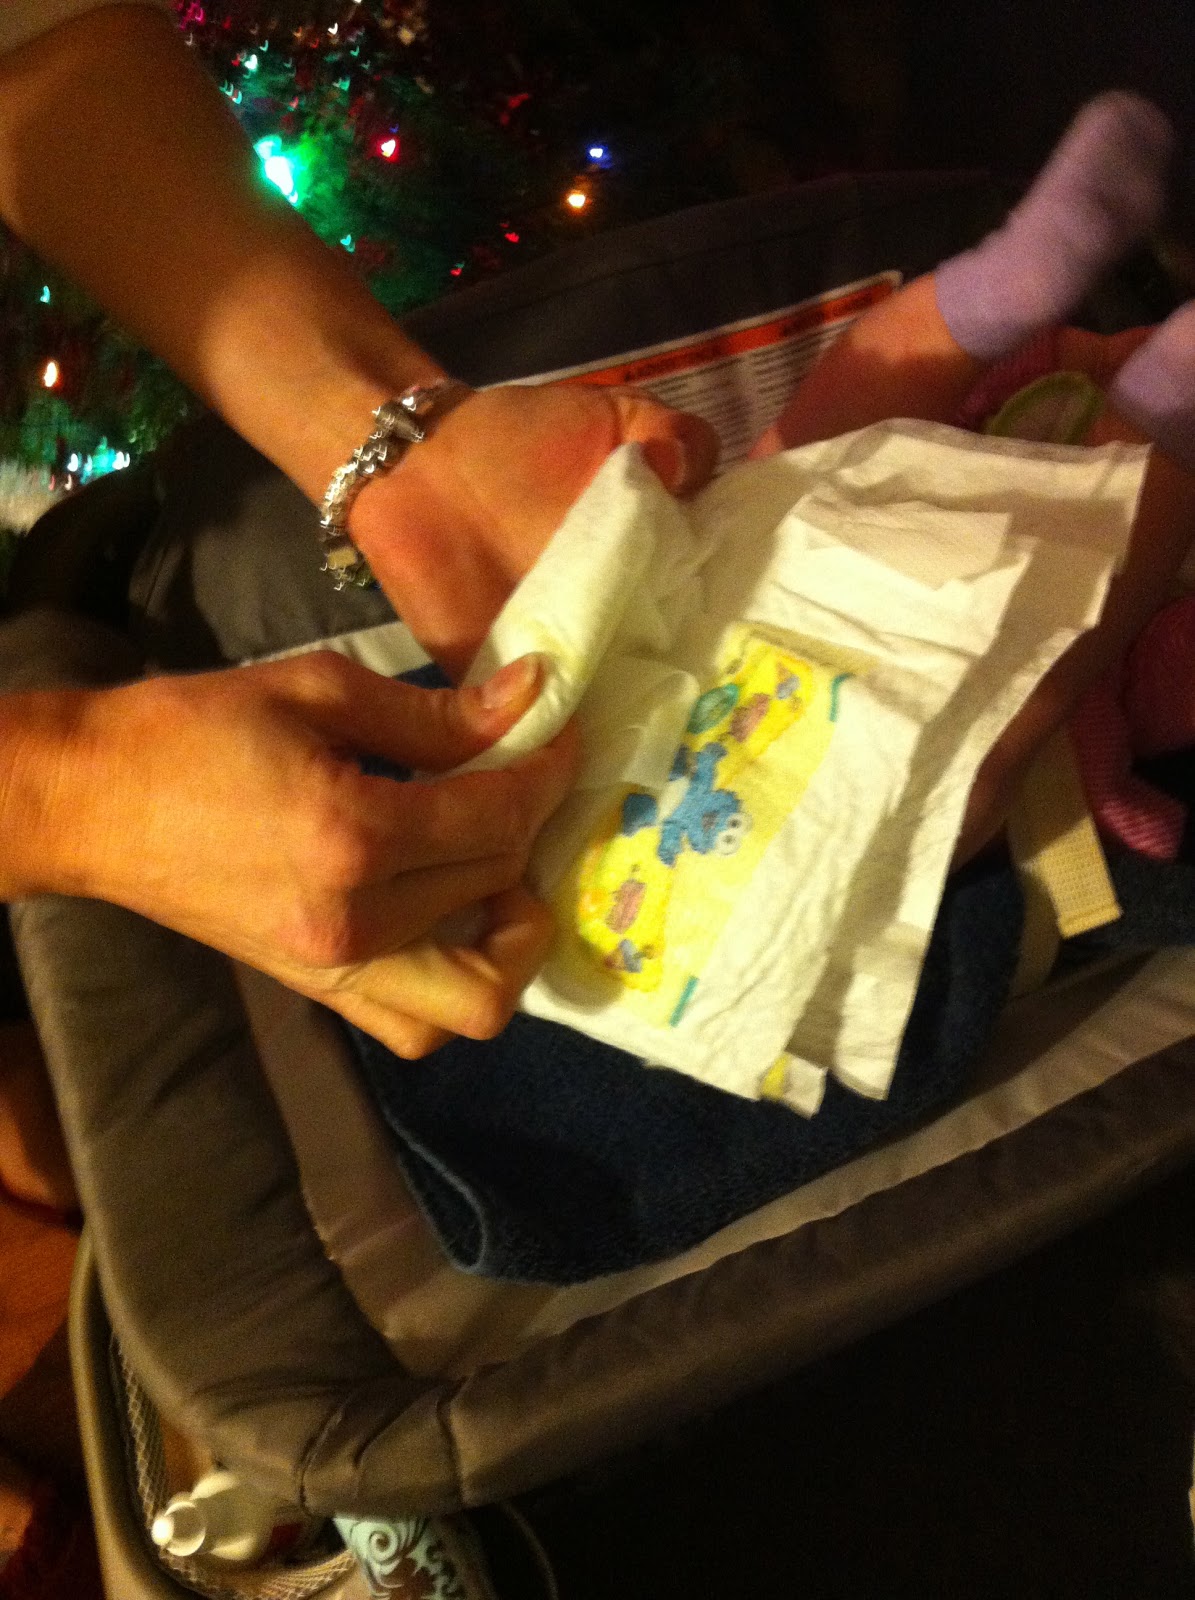
(I kept her actual diaper on and used a clean one to demonstrate.) Buckle her to changing table. While holding one leg up a little to keep bottom up, use front of dirty diaper to wipe excess poop/pee.  After this initial wipe, position diaper underneath her bottom to act as a barrier for the towel from any remaining poop/pee on her bottom.

  Use baby wipe(s) to clean diaper area from front to back.  Place dirty wipes, dirtiest side down on the dirty diaper.  


Slide diaper out of the way.  Immediately place ready and unfolded diaper under bum and pull front up and over so all is covered and you are protected.  


Roll the dirty diaper from the bottom towards the top, wrapping up the wipes.  Pull the left tab towards middle of the rolled diaper and fasten it so it doesn't come unwrapped. Take right tab and wrap as tight as feasible around the diaper to make a dirty diaper ball and toss.  We try to get them as small as  possible to save room in diaper pail.


Use another clean folded diaper to fan her/his area dry.  Don't forget between the cheeks.  Keeping the area dry will help prevent diaper rash.  


If you notice redness, apply either Desitin or baby powder.  Update: So lately I've been trying to use more all natural and homemade remedies for both saving money and for better health.  Here is a recipe from my friend ZoĆ« for an all natural, homemade diaper cream:
1 cup coconut oil, 8 drops of tea tree essential oil and 8 drops of lavender essential oil.


Fasten diaper and you're good to go!  This process worked the best for me.  As she got older, I was able to slack on certain parts.  Do what works best for you and your baby.  My daughter is now four months old and this seems to work well so far.  Will update as she gets older and more mobile.

6. Update: Tips on Cooperation: 
Diaper changes are one of a baby's least favorite activities.  If only they knew how important it is, lol!  Using distractions is the best way to get their mind of the changing.  And just when you find the perfect system, they'll change their minds and not like your distraction anymore leaving you trying to find something new.  Here are a few things that have worked for us, at least for a few changings.

  • Toys.  Rattles, stuffed animals, any kind that young ones can hold in their hands.
  • Pets.  I have used this one more recently with McKayla.  Not sure how well it would work for younger babies.  Lately I've been restricted in lifting things so I've been doing many of her diaper changes on the floor, at pet level.  She loves our animals so  one day after many struggles to get her changed a thought occured to me to involve the dogs.  I have one of my dogs lay down in the floor and then I ask McKayla to come lay down with the puppy.  Now she does it with no issues and she just looks at the dog commenting on their facial bodyparts or how cute they are.  It actually makes the task more enjoyable for me too and is definitely easier than dodging kicks to my pregnant belly.  Please be safe and use your discretion when involving your pets.
  • Books.  Small board books are perfect for those who can grasp them.  
  • Sing.  Sing a fun, silly, or soothing song.  This worked for a little while and sporadically still does.
  • Repeat after me.  Have a baby who can, repeat the numbers or the alphabet to you.  If they are too young, then just recite them for baby.
  • Wall decals.  Line the top of the changing table with wall decals.  I currently have the Disney princesses and when they first went up, they worked like a charm.  I would tell her their names and the color of their dresses and hair and we would count how many of them there were.  Now, I'll ask her to tell me.
  • Hanging Decoration.  I have three paper lanterns hanging above her changing table that, again, worked well when they first went up.  Taught her more about colors and counting too.
  • Someone Else.  Have a friend or family around?  Ask them to talk or sing to her.  Sometimes a voice other than yours is distraction enough.  If you and they are willing, have them change them.  My family/friends haven't had to fight her yet.
  • Location.  Try changing baby somewhere else in your house at different levels.  On the bed, couch, floor, even outside if possible.  Sometimes being changed somewhere new helps.  Have a basket or changing organizer that has everything you need to grab on the go.
  • Standing.  When your child is able to stand, try changing her diaper while she stands in the floor.  Not recommended for poopy diapers, but works great with peepee diapers.  
7. Update: Changing a Diaper When There's Not a Place to Change a Diaper:
It's not always a pleasant experience to change a diaper in public when there is no place to change your baby.  The worst is when you go to a restaurant that provides high chairs but not a changing table.  Here are some tips to help you get through an inconvienient public diaper change.

  • Use your vehicle, weather permitting.  I have been known to use my front seat, back seat, and trunk.  Please be safe and use your discretion when changing in the trunk.  If weather isn't nice, after getting the inside of your car to comfortable diaper changing conditions, do them in the seat with doors closed.  Very uncomfortable for you, but if you're desperate, it can be done.
  • As stated in 6 above, you can change while they stand.  I have done this as privately as I could using my car doors.  Or any bathroom stall will work, big ones are best.
  • If your stroller will allow, do it on that.  My stroller has a recline option and I've been able to change my daughter right on that at places like fairs, where there aren't many options.
  • I've never really had to change her on the ground, but if you find yourself in that position, use a changing pad for comfort for baby.  I've liked this one so far and have two now.